Thursday, October 29, 2009

Mask Previews and a call for pictures!

I've been working hard to get these costumes finished. They're almost there, but I've got a lot of small things to be tweaked before I can take some really nice full body shots. But until then, here are some photos of the finished masks! I apologize for the quality - they were taken from my laptop's camera - but they're at least a good preview of things to come.


Also, judging from the e-mails I've received, I know that a number of you have been using my tutorials to make Wild Things of your own. If you have, I'd love to see pictures of the final project! Send me a picture and I'll feature it here. I'd love to see what everyone's come up with.

Thursday, October 15, 2009

Making a Wild Thing Part 3: Excavation and Decoration

Finally part three!

Once your mask is dry, you'll want to pull it off the armature and remove the inner newspaper core and the clay. The first part is pretty easy - just lift up from the underside of the mask, and the entire piece should come off the armature - clay and all. It will look a bit like this:

You should be able to grab hold of the newspaper ball and just pull it straight out. Once you've removed the paper, it is time to excavate the clay. Depending on how much clay you used, you might be able to pull back the tinfoil and remove entire sections of the sculpture at once. If not (if the clay is too thick/heavy) go back through with your sculpting tools and dig the clay out bit by bit until you can pull the rest away with the tin foil.


After this step, you're ready to decorate! You can use scissors and an exacto knife to clean up the finished mask (and to cut eye holes), and I usually sand the mask and then gesso the surface before I paint. But from here you can add anything you want - horns, hair, anything - you can even sew into (if you have a strong enough needle)!


As you can see - my masks still require a few finishing touches, but once they're complete I'll post pictures of the final products. Until then - have fun making your own!

Monday, October 5, 2009

Making a Wild Thing Part 2: Papier Mache


On to part two:
Once you have a pretty good shape sculpted for your mask in clay, you’ll want to cover the clay in tinfoil. This allows you to smooth out the surface, refine details, and allows for easier excavation once it comes time to finish the mask. Slightly crumple a large sheet of tin foil and press it down covering the entire surface of your mask. Use your sculpting tools to smooth out the bumps in the foil and to add stronger details. If a few spots of clay show through the foil it won't be the end of the world - just remember that the more you cover the easier it will be to remove the papier mache when it is dry.

Next you need to prepare the papier mache. This step is twofold. First, you'll want to prepare the paper bags. You can also use newspaper, but when making masks I prefer to use brown paper bags because they are stronger, require fewer layers, and generally are faster to apply. To make the bags easier to work with, I crumple them significantly. The point here is to start to break down the fibers of the bags so that they absorb more of the papier mache mixture and to make the bags more flexible so that they are able to fold around the shape of your mask. The image to the right shows three paper bags crumpled to varying degrees. Ideally, you want your bags to look like the last one on the far right - like an old map or a worn piece of fabric.

Now you're going to mix the papier mache glue mixture. I use about two or three large scoops of wheat paste with a few cups of warm water and then add wood glue until the mixture becomes the consistency of runny snot. When your mixture is ready you can start to cover the mask. Make sure that you spray the foil covered surface with cooking spray before adding any of the papier mache - otherwise you will not be able to remove the mask. Allow each piece of bag to soak in the glue mixture for about 30 seconds to one minute and wring out the excess glue before putting it on the sculpted form. I try to use at least three layers of bags, sometimes a few more depending on the mask, before letting the mask dry. As the glue dries I like to refine the details even more (this is especially necessary if your mask has creases because the bags will pull away and flatten out as they dry - try and monitor the mask every few hours). The papier mache should take two to three days to dry completely though the outside should be dry overnight. However, even if the outside is completely dry, it does not mean that the inside will be too. I've had a few occasions when I've removed the mask too soon and it's shape will warp because the inside won't have anything to dry against. It is better to be safe here and wait a little longer.

Next up: Removing the mask and adding finishing touches

Friday, October 2, 2009

Making a Wild Thing Part 1a: Sculpting Video

Here's the video I mentioned earlier. You can see the process of building the newspaper core pretty clearly.

Making a Wild Thing Part 1: Sculpting the Face

The first thing I like to do on a large costume project is to make the mask or in this case, the face. Sculpting and covering the face is the most time consuming part of the process (so I start on it early to make sure I have enough time to fully devote to it) and I'm able to begin to develop the character of the entire costume as I work. I'm going to refer back to the mask making tutorial that I wrote last year since much of that information applies here. But this time I have pictures! Today we're following the process of creating Bernard

Materials Needed:
1 Box of Wheat Paste
1 Bottle of Wood Glue
Warm water
An armature/face-form
Lots of brown paper bags (thinner preferably – like liquor store bags)
Clay (each Wild Thing Mask took one 25lb bag)*
Tin Foil
Cooking Spray
Newspaper
Masking Tape

The armature that I use (pictured above) is a 3/4" piece of pipe, screwed into a floor flange, that is attached to a Lazy Susan. I like working on the Lazy Susan because it allows me to rotate my piece while I work to really make sure that I'm sculpting in three dimensions. But anything will work as long as it provides a good sturdy base for the armature.

Once you have an armature, you can take your newspaper and start building up an inner core for your mask (as shown right). This will enable you to make a large-scale mask without using tremendous amounts of clay (plus, if you use too much clay it will become too heavy and may fall off the armature). Crumple the newspaper, and with the masking tape, tape it tightly around the armature until you build up a ball just a little bit smaller than the size of your intended mask. You want to make sure to reinforce the newspaper the most at the top of the pipe because once you start adding clay, this is the point where your mask is most likely to break through. Because of this I like to add extra layers of newspaper or Styrofoam around the top of the pipe. If your mask is going to have appendages like a long nose or big ears (or this mask has a snout), you’ll want to reinforces these areas with Styrofoam or wooden dowels so that the weight of the clay does not cause them to break off once you start your mask. Wrap every layer tightly with masking tape! The end result will look like a mummy version of your mask. When you’ve finished creating the newspaper core, you’ll want to spray it lightly with a little water and stab it a number of times with a sharp clay tool so that they clay sticks better to the surface.

Next you get to start playing with clay! Treat this like any other sculpting project. Cover the general area of the mask in a layer of clay and then begin to build up the forms. Use whatever sculpting tools you have available to refine the shapes and add details. Here I used the Where The Wild Things Are book and my preliminary sketch as references. Just keep refining the form until you have the look that you want. Keep in mind that if you are creating something with lots of cracks and creases, you may want to make them more exaggerated since you will lose some definition when you add the papier mache.


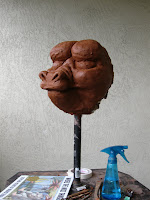
Here's my finished clay base for Bernard. I started a video of this process as I was making Moishe, and as soon as that is finished I'll post it here as well. Up next: Covering the Mask!


*Note: If you live in the Bay Area and are looking for a place to buy clay, I recommend
Claypeople in Richmond. They were very helpful and I was able to get 75 lbs of sale clay for $15! Hooray!